

Posted by Barb N.P. Team
on September 24, 2025
Getting lip fillers is exciting, but let’s talk about what happens after you leave the chair. Knowing what to expect during the recovery process is the key to feeling confident and loving your final outcome.
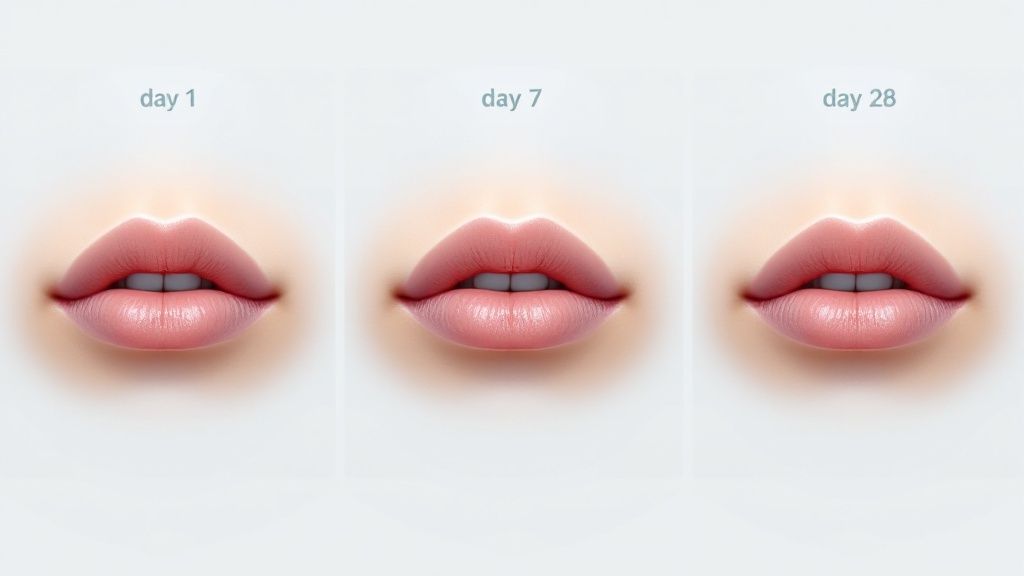
So, what’s the real story on lip filler recovery time? The short answer is that most of the noticeable swelling and any bruising will calm down within one to two weeks. But your final, beautifully settled results? You'll see those emerge around the four-week mark.
What to Expect During Lip Filler Recovery
The journey to your final, perfect pout is a process, not an instant reveal. I like to tell my clients to think of it like this: your lips are getting used to a new guest (the filler), and it takes a little time for everyone to get settled in. Understanding what’s normal will make the whole experience feel much smoother and less stressful.
The first 48 hours are definitely the most intense when it comes to swelling, but you’ll see it start to improve quickly after that. This initial puffiness is just your body's natural response to the tiny injections—it's a sign that the healing process has officially kicked off.
The Healing Timeline
To help you visualize the journey, here’s a quick overview of what to expect as your filler settles.
Lip Filler Recovery At a Glance
This table breaks down the key milestones in your healing process, from the initial swelling to the final, gorgeous result.
| Timeframe | What to Expect | Key Aftercare Tip |
|---|---|---|
| Day 1-2 | Peak swelling, tenderness, and potential bruising. Lips will look very full. | Gently apply a cold compress for 10 minutes at a time to reduce swelling. |
| Day 3-5 | Swelling and bruising begin to noticeably decrease. Lips start to soften. | Avoid salty foods and strenuous exercise to keep swelling down. |
| Week 1-2 | Most visible swelling and bruising have resolved. Your new lip shape is emerging. | Gently massage any small lumps only if instructed by your injector. |
| Week 4 | Filler has fully integrated with your tissue. Final shape, size, and feel are set. | Schedule a follow-up appointment to assess your results and plan any touch-ups. |
As you can see, the most dramatic phase is over quickly, with steady improvement day by day.
This visual timeline helps illustrate those key stages of recovery, from the initial puffiness to the final, settled look.
Remember, proper preparation is just as crucial as aftercare for a smooth and easy recovery. For a complete overview, make sure to read our guide on what to do before getting lip fillers. This article builds on that foundation, giving you a day-by-day breakdown so you know exactly what’s happening every step of the way.
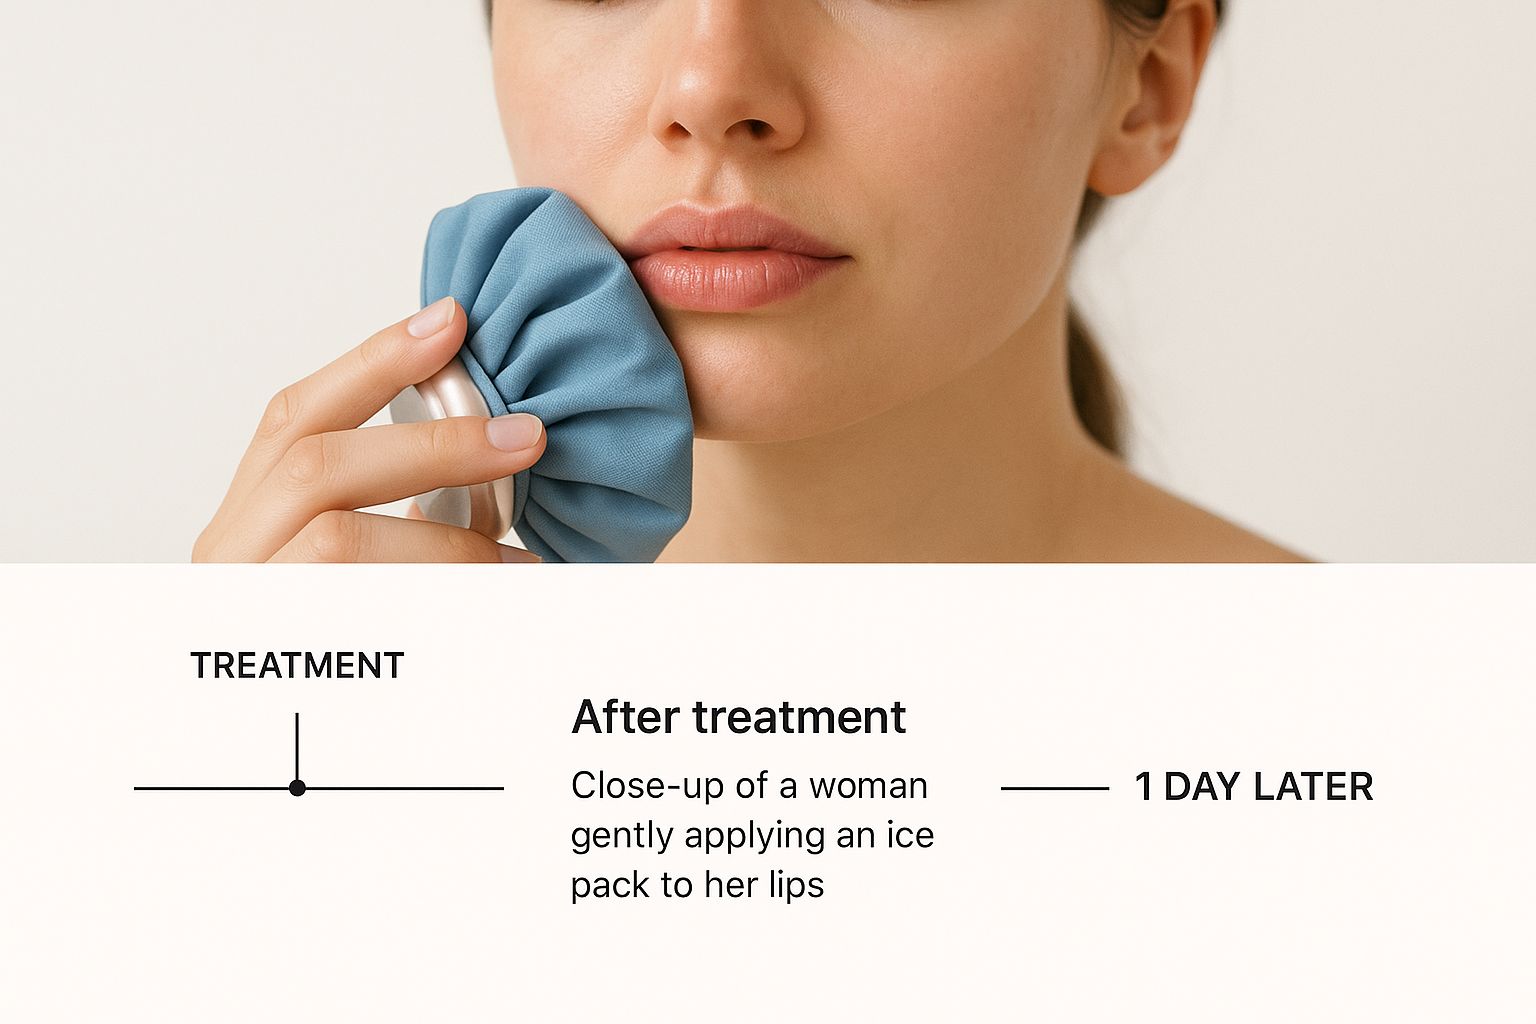
Navigating the First 48 Hours of Healing
The first two days after your lip filler treatment are, without a doubt, the most intense part of the recovery process. This is when you'll see the most dramatic swelling and changes, so knowing what's coming can make all the difference in feeling calm and in control.
Your body’s reaction to the injections is immediate—it kicks into healing mode, which means you’ll see temporary swelling, feel some tenderness, and maybe spot a little bruising.
Think of it this way: your body is sending its "first responders" to the area. That initial puffiness is completely normal and is the main reason your lips might look a bit 'overdone' or larger than you expected right after your appointment. This peak swelling usually happens within the first 24 to 48 hours and is a temporary but crucial part of the lip filler recovery time.
Managing Swelling and Discomfort
During these first two days, your number one job is to soothe the area and keep inflammation down. The absolute best way to do this is with a cold compress.
Gently apply an ice pack—wrapped in a thin towel or soft cloth—to your lips for about 10 minutes at a time. Do this several times throughout the day. This simple trick helps constrict the blood vessels, which works wonders for reducing both swelling and the chances of bruising.
Another easy but incredibly effective tip is to keep your head elevated, especially when you sleep. Pop an extra pillow under your head to let gravity do its job, helping fluid drain away from your face. This can make a huge difference in that "morning after" puffiness that catches so many people by surprise.
Key Takeaway: Swelling, tenderness, and even a bit of asymmetry are all perfectly normal signs of healing in the first 48 hours. It's all temporary and will start to go down much faster than you think.
What to Expect Visually
It's very common to see some minor bruising around the injection sites during this initial phase. The color might range from a light purple to a bluish tint, but don't worry—this is just a surface-level reaction that will fade over the next few days.
You might also notice that one side of your lip looks a little puffier than the other. This is also completely normal and almost always evens out as the overall swelling subsides.
To give your skin some extra support while it heals, you can incorporate a specialized product into your aftercare. The BARB N.P. brand offers fantastic skincare solutions that can complement your recovery. Keeping the surrounding skin nourished helps everything settle beautifully.
Most importantly, be patient with yourself and your body during these first two days. Try your best to avoid touching, pressing, or massaging your lips, as this can mess with how the filler settles into place. Following these simple rules will set you up for a smooth recovery and the gorgeous final results you're waiting for.
Your First Week After Lip Fillers

Once you get past that initial 48-hour peak, you can finally breathe a sigh of relief. The lip filler recovery journey gets much calmer from here. Between day three and day seven, you’ll start seeing the most dramatic swelling and bruising begin to fade, revealing a much clearer picture of your new look.
This is the week where your lips transition from feeling a bit firm and puffy to something much softer and more like your own. The initial tenderness will ease up, giving you a sneak peek of the beautiful, settled results that are just around the corner.
But a smooth recovery isn't just about waiting it out—it requires some mindful aftercare to help the filler integrate perfectly. What you do during these next few days really does impact your final outcome.
Key Dos and Don'ts for Days 3-7
Your main goal this week is simple: create a calm, healing-friendly environment for your body. That means avoiding anything that could ramp up blood flow to your face, which can bring back swelling and drag out your recovery. Staying hydrated and being gentle are your top priorities.
A great way to support the skin around your lips during this phase is with high-quality, gentle products. The BARB N.P. skincare line, for example, has some incredible soothing serums and moisturizers that can nourish the area without causing any irritation.
Here's a straightforward guide to get you through the week:
- Do stay hydrated: Drinking plenty of water is a non-negotiable. Proper hydration helps your body flush itself out and supports the healing process, allowing that hyaluronic acid filler to settle in beautifully.
- Don't engage in strenuous exercise: Heavy lifting, intense cardio, or a hot yoga session will get your heart rate up and blood pumping, which can lead to a frustrating resurgence of swelling. Stick to light walking for a few more days.
- Do eat a healthy diet: Focus on whole, nutrient-rich foods and keep avoiding excess salt. Salt makes your body retain water, and that means more puffiness.
- Don't drink alcohol: Alcohol is a vasodilator, meaning it widens your blood vessels. This can increase blood flow to your lips and bring back bruising and swelling. It’s best to steer clear for the first week.
Following these simple guidelines is the most effective way to manage your lip filler recovery time. By avoiding the things that trigger swelling, you're actively helping your body heal faster and more efficiently.
By the end of this first week, you should notice a massive reduction in both swelling and bruising. You might still have some minor, residual puffiness, but your lips will look and feel so much more settled. This is when the real excitement for your final results starts to build
Seeing Your Final Results Emerge
This is where your patience truly pays off. From week two to the one-month mark, your lip filler recovery time shifts from active healing to the big reveal. The filler finally starts to settle completely, unveiling the soft, natural-looking volume you’ve been waiting for.
During this time, any minor lumpiness or unevenness you might have felt earlier will almost always resolve on its own. It’s a rewarding process—the hyaluronic acid filler integrates seamlessly with your own lip tissue, making your lips feel completely natural to the touch as the last traces of swelling vanish.
By the end of week two, most people feel confident enough to jump back into all their normal routines. Go ahead and wear your favorite bold lipstick or resume those high-impact workouts without a second thought.
The Importance of the Follow-Up Appointment
Around the four-week mark, you'll have a follow-up appointment scheduled with your injector. Don't skip this—it's a crucial final step in the process. This check-in is the perfect opportunity for your provider to assess your final results and make sure everything has healed just as it should.
During this visit, your injector will be looking at a few key things:
- Symmetry: Ensuring both sides of your lips are balanced and create harmony with your other facial features.
- Smoothness: Confirming that no persistent lumps or bumps remain after the settling period.
- Satisfaction: This is your time to discuss the outcome and make sure you absolutely love your new look.
This appointment is also the ideal time for any tiny tweaks or adjustments to be made, if needed, to perfect your results. It's fascinating how the filler integrates with your tissue, and if you want to dive deeper into the science, you can learn more about how dermal fillers work in our detailed guide.
Did you know? Lip filler effects last for approximately 6 to 12 months on average. Clinical data shows that visible lip fullness often peaks between 2 to 4 months after treatment. This is the sweet spot when the filler has fully integrated and settled into the lips, giving you the most beautiful and stable result.
By the end of the first month, your lips should feel just like your own—only better. This final, settled look is the gorgeous outcome of a patient and well-managed recovery.
Essential Aftercare and Activities to Avoid
Knowing what to steer clear of after your lip filler appointment is just as crucial as the icing and arnica you’ll be using. To protect your investment and get those gorgeous, smooth results, you need to avoid a few specific things that can mess with healing and extend your lip filler recovery time.
Think of your lips as delicate and sensitive for that first week. It’s not just about skipping a heavy workout; even small daily habits can make a huge difference in how quickly the swelling goes down and how beautifully your filler settles in.
Little Things That Make a Big Difference
To keep it simple, the goal is to avoid anything that increases blood flow to your face or puts unnecessary pressure on your lips. This is your best defense against extra swelling, bruising, and the dreaded filler migration. Being mindful for just a few days can completely change your recovery game.
Here's a quick rundown of what to skip:
- Blood-Thinning Supplements: Things like fish oil, vitamin E, and NSAIDs (think ibuprofen or Advil) can make you more prone to bruising. It's smart to pause them for a couple of days before and after your treatment.
- Drinking Through Straws: That pursing motion puts direct pressure on the fresh filler. For the first few days, sip your drinks directly from a glass.
- Salty Snacks and Processed Foods: High-sodium foods are notorious for causing water retention, which can make swelling look and feel much worse. Stick to fresh, whole foods to help keep puffiness under control.
- Dental Work and Facials: Any appointment that involves pressure, stretching, or massaging your face needs to be rescheduled. Wait at least two weeks to give the filler plenty of time to settle in perfectly without being disturbed.
Protecting your investment is key. A smooth recovery often comes down to the small, smart choices you make in the days following your appointment, ensuring the filler integrates perfectly for a natural-looking result.
To make it even clearer, here’s a table outlining what to avoid and for how long.
Activities to Avoid After Lip Fillers
This is your go-to guide for what to put on pause after your treatment to ensure the best possible results.
| Activity / Item to Avoid | Reason to Avoid It | Recommended Waiting Period |
|---|---|---|
| Strenuous Exercise | Increases blood flow, which can worsen swelling and bruising. | 24-48 hours |
| Alcohol | Acts as a blood thinner, increasing the risk of bruising. | At least 24 hours |
| Extreme Heat (Saunas, Hot Tubs) | Vasodilation from heat can increase swelling and inflammation. | At least 48 hours |
| Salty or Spicy Foods | Can dehydrate lips and contribute to extra swelling. | 24-48 hours |
| Smoking / Vaping | The puckering motion puts pressure on the lips and can delay healing. | At least 24 hours |
| Kissing | Firm pressure can displace the filler before it has settled. | At least 48 hours |
| Using Straws | The suction and lip pursing can put pressure on the injection sites. | 48-72 hours |
| Facials / Facial Massages | Can move the filler before it fully integrates with your tissue. | At least 2 weeks |
| Dental Appointments | The stretching and pressure on the mouth can affect filler placement. | At least 2 weeks |
Following these simple guidelines helps ensure your filler settles beautifully and you can get back to your routine without any hiccups.
Gentle Skincare is Non-Negotiable
While your lips are healing, the skin around them also needs some TLC. This isn't the time for aggressive exfoliants, harsh scrubs, or strong cleansers, which can cause unnecessary irritation. Your best bet is to switch to gentle, nourishing products.
A high-quality, soothing skincare routine can really support the healing process. For instance, the BARB N.P. brand offers medical-grade skincare that’s perfect for post-procedure care. These products help keep the skin around your lips calm and hydrated without causing any trouble. By treating the entire area with care, you create the perfect environment for a flawless outcome.
Power Up Your Recovery with At-Home LED Therapy
Beyond diligent icing and steering clear of salty foods, you can actually take an active role in helping your skin bounce back. Some of the most effective aftercare technologies, once reserved for professional clinics, are now available to use right at home to calm inflammation and significantly cut down your lip filler recovery time.
One of the best tools for this is LED light therapy. Specifically, red light therapy is a game-changer for its ability to gently penetrate the skin and kickstart cellular repair. It works by boosting circulation and calming inflammation, which directly tackles the swelling and bruising that can hang around after your filler appointment. It’s a completely non-invasive way to create the perfect healing environment for your skin.
Meet the BARB N.P. Facial Mask
To bring this powerful technology into your routine, the BARB N.P. Facial Mask is the perfect at-home device. It was designed with comfort and real results in mind, making it a brilliant addition to your post-treatment care.
What makes this mask stand out is its thoughtful design, especially for sensitive, post-procedure skin. It’s completely wireless, giving you the freedom to relax on the couch or walk around the house during your session. Most importantly, its lightweight fit won't put any uncomfortable pressure on your newly treated face and lips.
Think of it this way: gentle, targeted treatments like LED therapy give your skin the support it needs to heal beautifully. It’s about arming your body with the best tools to recover efficiently and smoothly.
The mask comes with three different light settings, so it's a versatile tool you'll use long after your lips have settled. You can dive deeper into the science behind the extensive benefits of LED light therapy in our detailed article, which breaks down how each color works.
- Red Light: Your go-to for post-filler care. It’s fantastic for reducing inflammation and encouraging collagen production.
- Blue Light: Targets acne-causing bacteria, making it a must-have for anyone dealing with breakouts.
- Yellow Light: Works to calm redness and boost circulation for an all-over brighter, more even-toned complexion.
This kind of versatility makes the BARB N.P. mask a smart investment in your long-term skin health, offering benefits that go far beyond just the initial recovery phase.
Answering Your Top Lip Filler Recovery Questions
Even with a day-by-day guide, you’re bound to have questions pop up as you heal. That’s completely normal. Think of this section as your direct line for expert answers to the most common concerns about lip filler recovery time. We’ll clear up any confusion so you can feel confident as your beautiful new lips settle in.
When Will My Lips Look Normal?
I know this is the big one! While the peak swelling hits in the first 48 hours, you’ll find your lips look much more “normal” and ready for public view within 3 to 5 days. Any little bruises that hang around can usually be camouflaged with a bit of makeup after those first few days.
But for the final, fully settled result? You’ll want to give it about four weeks. That’s the magic mark when the filler has beautifully integrated with your own tissue, revealing that soft, plump shape you were hoping for.
Is It Normal for My Swelling to Be Uneven?
Yes, absolutely. It’s incredibly common—and totally fine—for one side of your lip to look puffier or more bruised than the other. This little bit of asymmetry is just a reflection of the injection process and your body’s unique way of healing.
This unevenness almost always sorts itself out as the swelling goes down over the first week or two. If you’re past the 14-day mark and still notice significant asymmetry, that’s when it’s a good idea to check in with your injector for a quick follow-up.
Let’s be real: seeing lumps or unevenness in the first week can be a little alarming. But it’s a very normal part of the process. Your body is healing, and the filler is still finding its final resting place. Patience is your best friend right now.
What Should I Do If I Feel Hard Lumps?
Don't panic! Feeling small, firm bumps in your lips is a very frequent occurrence in the first two weeks after your treatment. These are usually just tiny pockets of swelling or the filler itself before it has had a chance to fully soften and blend into your tissue.
The vast majority of the time, these little lumps will soften and disappear all on their own. It’s so important to resist the urge to aggressively massage them unless your provider specifically told you to. Messing with them too early could shift the filler. If the lumps are painful, visible, or still there after two weeks, give your injector a call.
To give your skin some extra love and support while it heals, you might consider adding a professional tool to your routine. The BARB N.P. Facial Mask is a fantastic option for post-treatment care. Its wireless, comfortable design makes it a breeze to use, and its three light settings offer versatile treatments long after your lips have healed.
At BotoxBarb, we know that an informed patient is a happy patient. Ready to explore more? Check out our full range of aesthetic services and medical-grade skincare at https://barbnp.shop.